Some links on this page are Amazon affiliate links. If you buy through them, we earn a small commission at no extra cost to you.

Overview
A green screen unlocks almost any background you can imagine, but the compositing you do later is only as good as the light you put down on set. No amount of pulling, feathering, or spill suppression in post will save footage where the background is patchy, shadowed, or contaminated with green. The single goal of green screen lighting is a background that reads as one flat, uniform green, with a subject lit independently so the two can be cleanly separated. Do that well and even a budget fabric screen with hardware-store lamps will key like a studio. Skip it and the most expensive gear still looks like a cheap weather forecast.
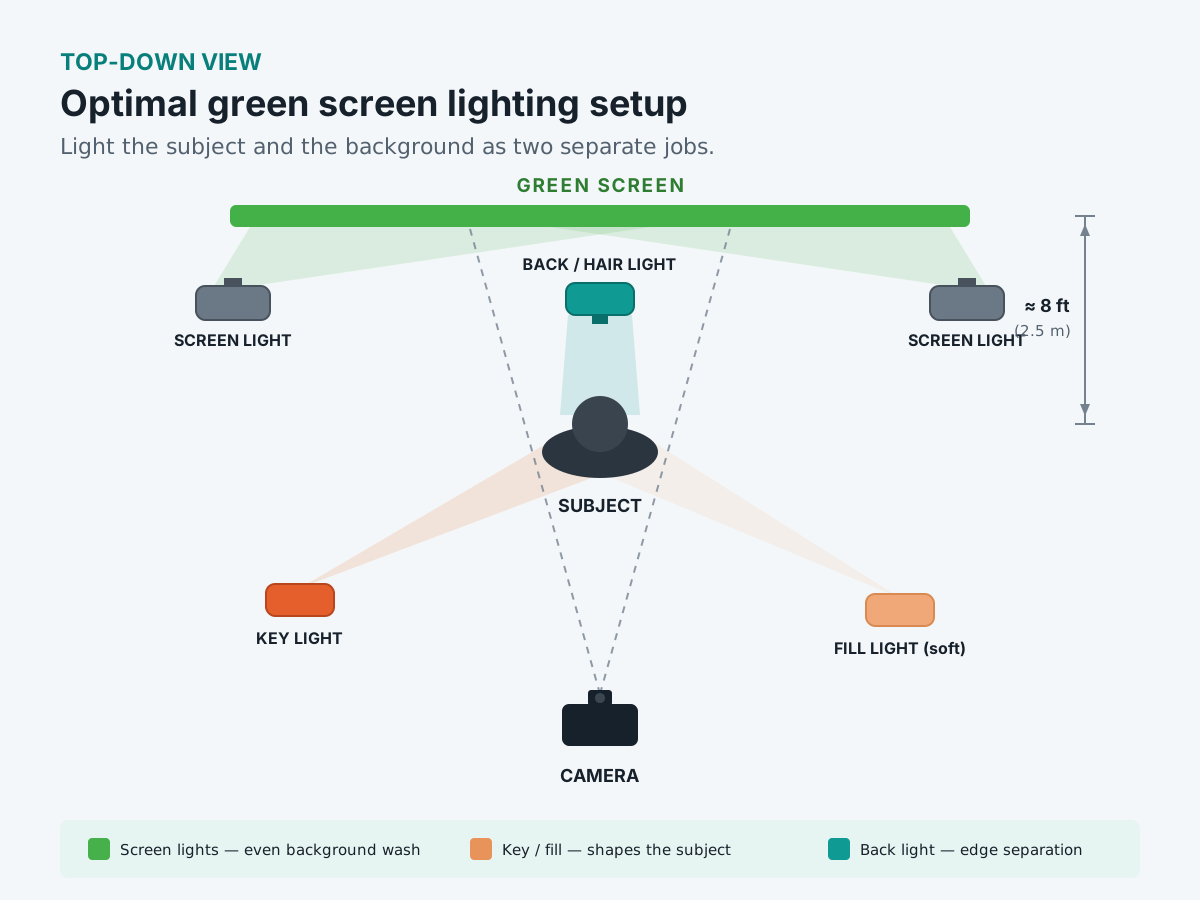
What You Need
- A green screen, seamless paper, wrinkle-free fabric (muslin), or a wall painted with dedicated chroma-key green.
- Two matched lights for the background, identical make and model so their color and output agree.
- Lights for the subject: a key, a soft fill, and ideally a back or hair light.
- A camera with manual control over white balance, ISO, and shutter.
- Room to work, enough depth to put roughly eight feet between subject and screen.
Why Bad Keys Happen
You have almost certainly seen a chroma key fail: a fuzzy green fringe around someone's shoulders, a halo where their hair should be, or a background that looks painted on. A few recurring culprits are behind most of it:
- Uneven brightness. Hot spots and dark corners give the keyer more than one "green" to remove, so no single setting cleans the whole frame.
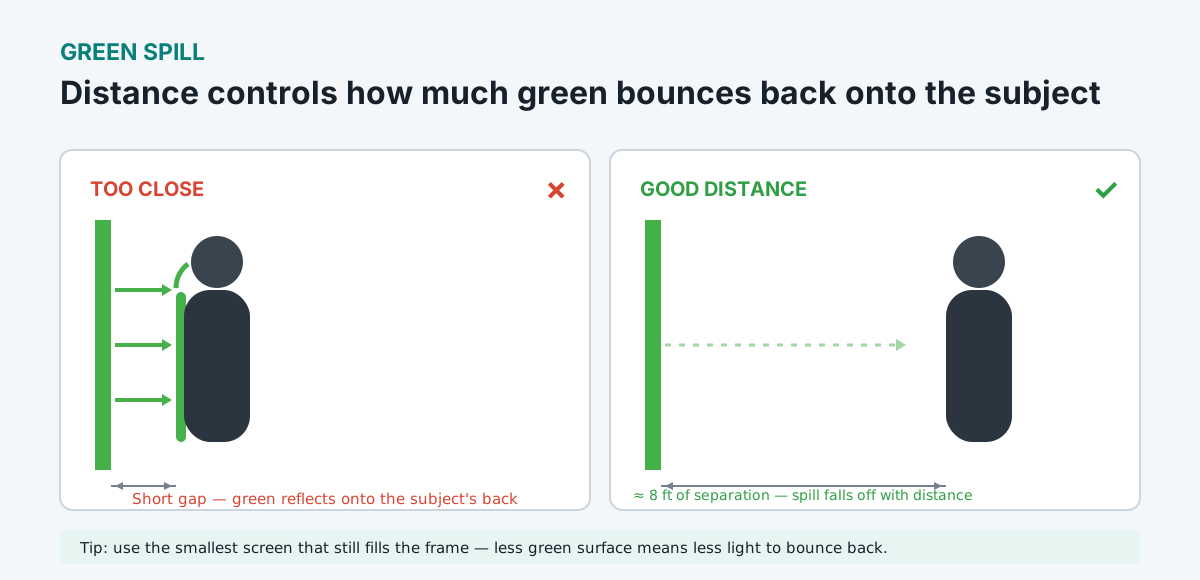
- Green spill. Light bouncing off the screen wraps around the subject, tinting hair, shoulders, and skin with green that is hard to remove without eating into the edges.
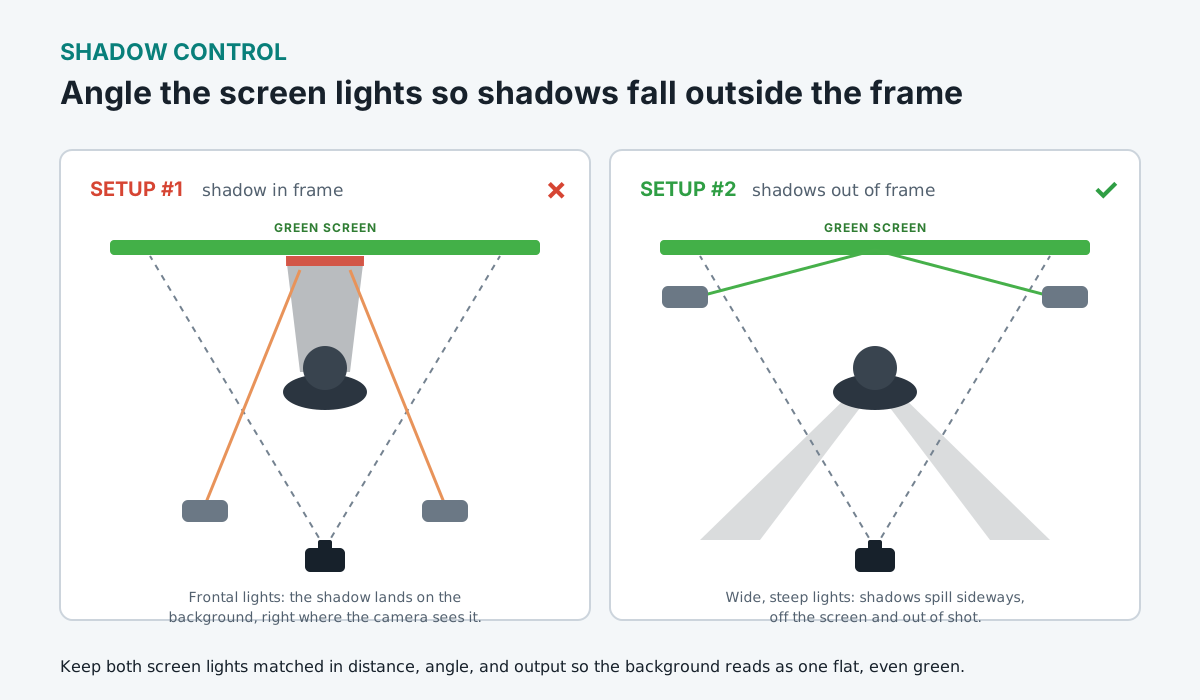
- Shadows on the screen. A shadow is just a darker green: another tone the keyer has to account for, especially near the subject's feet or body.
- Motion blur and compression. A slow shutter smears edges, and heavy compression throws away the fine detail (strands of hair, transparency) that a clean key depends on.
Every step below exists to remove one of these problems before the camera rolls.
Steps
Rig and flatten the screen
Mount the screen taut so there are no wrinkles, folds, or seams to catch light and read as shadow. Steam or stretch fabric, or roll out paper smoothly. Then audit the shot for anything reflective (jewelry, glasses, watches, glossy wardrobe) because those surfaces will mirror green straight back into the lens. If a prop has to be shiny, plan to matte or replace it later.
Separate the subject from the background
Distance is the cheapest fix on set. Standing the subject about eight feet (2.5 m) in front of the screen does three things at once: it stops background light from spilling onto them, it keeps reflected green off their back and edges, and it gives their shadow somewhere to fall other than the screen. If your room is small, buy as much separation as you can. Every foot helps.
Light the subject first
Light your subject before you touch the background. If you light the screen first and then discover the subject needs a different look, you will have to redo the background anyway. Build a standard three-point setup:
- Key light. The main, brightest source, placed where light would naturally come from in the world you are compositing into.
- Fill light. A soft, dimmer source opposite the key that opens up shadows so contrast stays believable.
- Back / hair light: behind the subject, aimed at the head and shoulders, carving a rim of light that separates them from the background and helps the keyer find the edge.
Match the direction, color, and hardness of this light to your intended background. A hard, warm key sells an exterior. Soft, even light sells an interior. Getting this right now is what makes the final composite feel like one photograph rather than two.
Light the screen evenly
Now flood the background. Use two lights, one on each side, set to the same distance, height, angle, and output so their pools overlap into a single even wash. This is the one place matched lights genuinely matter: two fixtures with different color temperatures will lay down two different greens, and no keyer likes that. Soft, broad sources (fluorescent banks, LED panels with diffusion) spread more evenly than hard spotlights. Aim for a background that is uniform corner to corner, then confirm it with your camera rather than your eye.
Control shadows and spill
Where you place the background lights decides where the subject's shadow lands. Set frontally, the lights throw the shadow straight back onto the screen, right inside the frame. Angle them wider and steeper and the shadows fall off to the sides, out of shot, leaving the visible background clean. Combined with the separation from step 2, this is how you get a truly flat green behind the subject.
Expose the green screen
Finally, dial in the camera. Fix your white balance to your lights so the green stays consistent. Expose the background a touch below a normal middle exposure. A slightly darker, saturated green keys better than a blown-out, desaturated one. Drop to your camera's native ISO to minimize the noise that shows up as flickering specks in the matte, but not so far that the green goes muddy and underexposed. Keep a normal shutter (a 180-degree shutter angle) so movement does not smear the edges. Then check evenness objectively with false color, a waveform, or zebras. Your eyes adapt to green and lie to you. Adjust a light or two now. It saves hours later.
Green or Blue?
Green is the default because digital sensors devote the most resolution to green and it keys cleanly with the least light. Reach for blue instead when your subject contains green (outdoor foliage, certain costumes) or when you want less color spill on skin and a lower-noise matte, which is why blue persists in high-end and film-originated work. Whichever you choose, the lighting principles on this page are identical: flat, even background. Separated, independently lit subject.
Pro Tips
- Use the smallest screen that still fills the frame. Less green surface means less light bouncing back as spill, and a smaller screen is cheaper and easier to light evenly.
- Trust your tools, not your eyes. Judge background evenness with false color or a waveform. The eye adapts to green within seconds and stops seeing unevenness.
- Modern cameras are very light-sensitive, so you may need less output than you expect. If your lights are weak, a higher native ISO can help, but watch for added noise.
- Add a hair or rim light whenever the subject's hair color is close to the background brightness, or the keyer will struggle to find the edge.
- Record the cleanest codec you can. Chroma subsampling and heavy compression quietly destroy edge detail that no amount of relighting recovers.
- Fixing it in post is a fallback, not a plan. Screen balancing and spill suppression in After Effects, DaVinci Resolve, or Premiere Pro can rescue a lot, but transparency, fine hair, and motion blur pay the price. Light it right first.
Where This Fits
A green screen wants flat light and the subject wants shape, and Cinematography Fundamentals explains the ratios that give the subject its shape.
Translate this page
- Español
- 简体中文
- हिन्दी
- العربية
- Português
- Français
- Deutsch
- 日本語
- Русский
- Bahasa Indonesia
- 한국어
- Italiano
- Türkçe
- Tiếng Việt
- Polski
- Nederlands
Machine translation provided by Google Translate, on Google’s servers. We do not check these translations and they will get technical terms wrong. The English page is the authoritative one. Following a link sends this page’s address to Google. Your browser may also offer to translate this page itself, which keeps the request on your device.